Tutorial Animation Tips: Difference between revisions
No edit summary |
|||
| (21 intermediate revisions by the same user not shown) | |||
| Line 4: | Line 4: | ||
Make sure you have the Lift.mch model from the first part of the tutorial: [[Tutorial First Step|Starting ProB and first animation steps]]. | Make sure you have the Lift.mch model from the first part of the tutorial: [[Tutorial First Step|Starting ProB and first animation steps]]. | ||
== | == Operation with many solutions for the parameters == | ||
Add the following operation to the Lift model: | Add the following operation to the Lift model: | ||
| Line 20: | Line 20: | ||
The orange "max" button to the left of "Enabled Operation" tells you that not all possible parameter values for the operations were computed. | The orange "max" button to the left of "Enabled Operation" tells you that not all possible parameter values for the operations were computed. | ||
There are | There are several solutions to overcome this. | ||
=== Increasing MAX_OPERATIONS === | === Increasing MAX_OPERATIONS or MAX_INITIALISATIONS=== | ||
First, you could increase the "MAX_OPERATIONS" preference of ProB by selecting the "Animation Preferences" command in the "Preferences" menu: | First, you could increase the "MAX_OPERATIONS" preference of ProB by selecting the "Animation Preferences" command in the "Preferences" menu: | ||
| Line 30: | Line 30: | ||
[[file:ProB_Lift_OpPane_WithJump101.png|center||200px]] | [[file:ProB_Lift_OpPane_WithJump101.png|center||200px]] | ||
Note there is another preference "MAX_INITIALISATIONS" which controls how many solutions are computed for SETUP_CONSTANTS and for INITIALISATION. | |||
Note: you can also set either of these preferences to 0. | |||
In this case, no solutions will be automatically be pre-computed for you, but | |||
you can use "Execute an Operation..." below. You can then also double-click on individual operation names for this. | |||
=== Increasing MAX_OPERATIONS for an individual operation === | |||
As of version 1.9.0 of ProB you can also set the MAX_OPERATIONS limit individually per operation. | |||
For this you need to add a declaration in the DEFINITIONS section of your B machine: | |||
<pre> | |||
DEFINITIONS | |||
MAX_OPERATIONS_jump == 101 | |||
</pre> | |||
=== Executing an Operation by Predicate === | === Executing an Operation by Predicate === | ||
The alternative is to provide the parameter value for <tt>level</tt> yourself. | The alternative is to provide the parameter value for <tt>level</tt> yourself. | ||
For this, select the "Execute Operation..." command in the animate menu: | For this, select the "Execute an Operation..." command in the animate menu: | ||
[[file:ProB_Lift_ExecuteOperationMenu.png|center||200px]] | |||
[[file: | |||
After that, select the <tt>jump</tt> operation | After that, select the <tt>jump</tt> operation | ||
[[file: | [[file:ProB_ExecuteOperation.png|center||350px]] | ||
and you will be provided with the following dialog: | and you will be provided with the following dialog: | ||
[[file:ProB_Lift_ExecuteOperation_Dialog.png|center|| | [[file:ProB_Lift_ExecuteOperation_Dialog.png|center||490px]] | ||
Type in <tt>98</tt> into the level field and hit the "Execute" button. | Type in <tt>98</tt> into the level field and hit the "Execute" button. | ||
[[file:ProB_Lift_OpPane_WithJump_Exec98.png|center||200px]] | [[file:ProB_Lift_OpPane_WithJump_Exec98.png|center||490px]] | ||
Note: instead or in addition to providing concrete values, you can also specify a predicate that constrains the values of the parameters: | |||
[[file:ProB_Lift_ExecuteOperation_Dialog_Pred.png|center||490px]] | |||
The above predicate, <tt>level>96 & level mod 2 =0</tt> would select the same value <tt>98</tt> for level. | |||
When there are multiple solutions, ProB will only execute the operation for the first solution found. | |||
=== Using Random enumeration === | |||
You can also tell ProB to try and perform random enumerations. | |||
This feature is available in ProB 1.5.0 or newer. | |||
You add the following lines to your model: | |||
DEFINITIONS | |||
SET_PREF_RANDOMISE_ENUMERATION_ORDER == TRUE | |||
Alternatively, you can set this preference using the "Advanced Preferences" pane in the Preferences menu. | |||
After reloading the machine you should see a picture similar to the following one: | |||
[[file:ProB_Lift_Randomise.png|center||650px]] | |||
=== Using Constraint-Based Validation Techniques === | |||
==== Find Sequence ==== | |||
You can also use the constraint solver to construct sequences which are of interest to you. | |||
Let us add the following operation to the lift model: | |||
top_reached = PRE floor=99 THEN skip END | |||
Now suppose we want to execute this new operation as early as possible. | |||
We can ask the constraint solver to generate a feasible sequence of operations. | |||
First select the "Find Sequence..." command in the Verify menu: | |||
[[file:FindSequenceMenu.png|center||400px]] | |||
Now type in | |||
jump ; top_reached | |||
in this dialog box: | |||
[[file:FindSequenceDialog.png |center||500px]] | |||
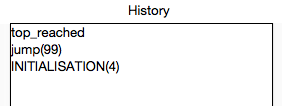
ProB will then find a solution operation sequence for you and execute it: | |||
[[file:FindSequenceResult.png |center||300px]] | |||
==== Constraint-Based Model-Based Testing ==== | |||
Alternatively, you could for example use the constraint-based test-case generator to find for every operation the shortest trace that enables it. | |||
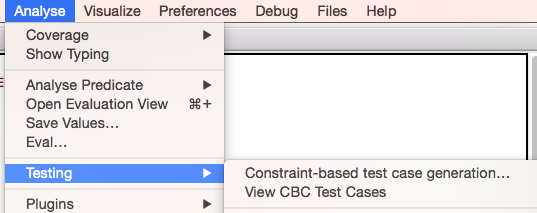
First select the "Constraint-based Testcase Generation.." command in the Analyse menu: | |||
[[file:CBCMBTMenu.png|center||400px]] | |||
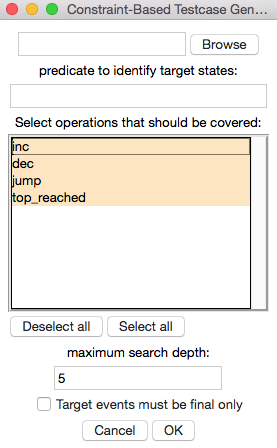
Now click on the ok button in the dialog box (which allows you to select the target operations to cover in the generated test cases): | |||
[[file:CBCMBTDialog.png |center||200px]] | |||
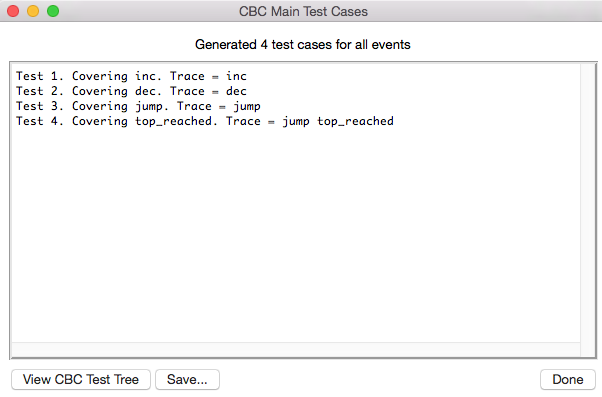
ProB will then find four test cases for you, one for each operation: | |||
[[file:CBCMBTResult.png |center||400px]] | |||
You can also visualise these test cases as a tree by clicking the "View Tree" button: | |||
[[file:CBCMBTTreeResult.png |center||600px]] | |||
Green entries show test cases (traces which cover an operation in the shortest possible way), gray entries are traces which did not contribute to a test case. | |||
More details are available in the [[Tutorial_Model-Based_Testing]] and [[Tutorial_Model_Checking,_Proof_and_CBC]] sections. | |||
=== Using Trace Replay === | |||
You can store traces in JSON format using ProB. | |||
These traces contain values for the constants, initial values | |||
and operation arguments. | |||
If you wish you can generate such traces programmatically | |||
or modify them by hand and try to replay them. | |||
=== Using EXTENDS === | |||
If you have many possible valuations for constants you may want to consider to generate one or more instantiations of your machine for animation or model checking. | |||
For example, given a machine | |||
<pre> | |||
MACHINE Generic | |||
SETS USERS | |||
CONSTANTS root | |||
PROPERTIES root : USERS | |||
END | |||
</pre> | |||
In classical B you can use EXTENDS to create an instantiation machine: | |||
<pre> | |||
MACHINE Instance1 | |||
EXTENDS Generic | |||
CONSTANTS peter, paul, mary | |||
PROPERTIES | |||
USERS = {peter,paul,mary} & | |||
card({peter,paul,mary}) = 3 & // all different | |||
root = mary | |||
END | |||
</pre> | |||
This instance machine acts a bit like a configuration file for ProB. | |||
In Event-B you can use the extends concept for contexts to achieve this effect, | |||
[[Tutorial_Rodin_Parameters#Using_contexts_for_ProB_animation|as explained here]]. | |||
Latest revision as of 08:37, 3 May 2023
Make sure you have the Lift.mch model from the first part of the tutorial: Starting ProB and first animation steps.
Operation with many solutions for the parameters
Add the following operation to the Lift model:
jump(level) = PRE level : 0..99 THEN floor := level END
Now reload your model and initialise the machine. Your ProB window should now look as follows:
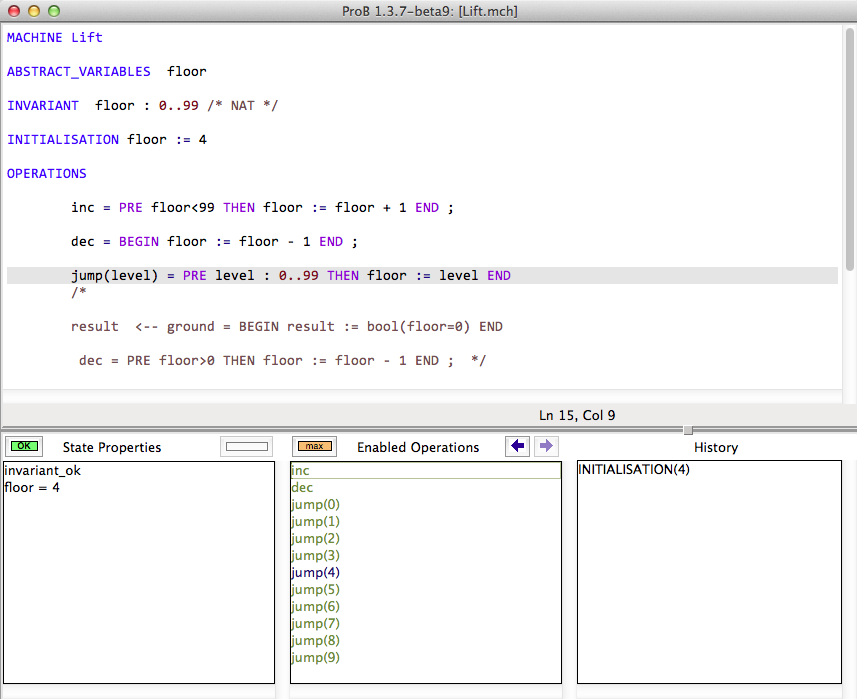
As you can see, only 10 values for the level parameter of the jump operation are displayed in the "Enabled Operations" pane. The orange "max" button to the left of "Enabled Operation" tells you that not all possible parameter values for the operations were computed.
There are several solutions to overcome this.
Increasing MAX_OPERATIONS or MAX_INITIALISATIONS
First, you could increase the "MAX_OPERATIONS" preference of ProB by selecting the "Animation Preferences" command in the "Preferences" menu:

You should then set the preference "" to at least 101 and then re-load the B machine.
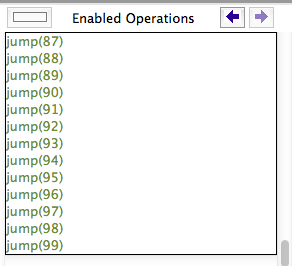
Note there is another preference "MAX_INITIALISATIONS" which controls how many solutions are computed for SETUP_CONSTANTS and for INITIALISATION.
Note: you can also set either of these preferences to 0.
In this case, no solutions will be automatically be pre-computed for you, but
you can use "Execute an Operation..." below. You can then also double-click on individual operation names for this.
Increasing MAX_OPERATIONS for an individual operation
As of version 1.9.0 of ProB you can also set the MAX_OPERATIONS limit individually per operation. For this you need to add a declaration in the DEFINITIONS section of your B machine:
 DEFINITIONS
   MAX_OPERATIONS_jump == 101
Executing an Operation by Predicate
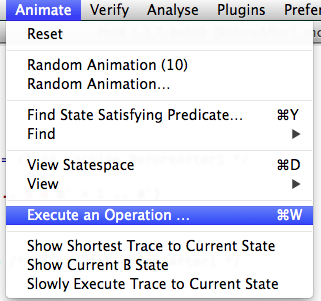
The alternative is to provide the parameter value for level yourself. For this, select the "Execute an Operation..." command in the animate menu:
After that, select the jump operation
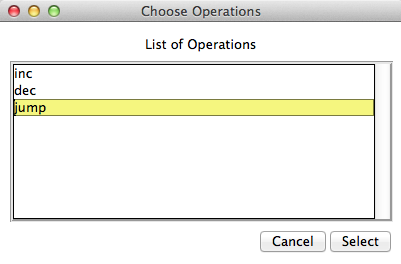
and you will be provided with the following dialog:
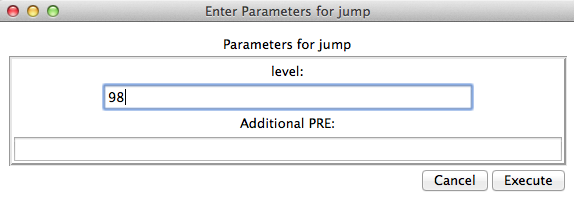
Type in 98 into the level field and hit the "Execute" button.

Note: instead or in addition to providing concrete values, you can also specify a predicate that constrains the values of the parameters:
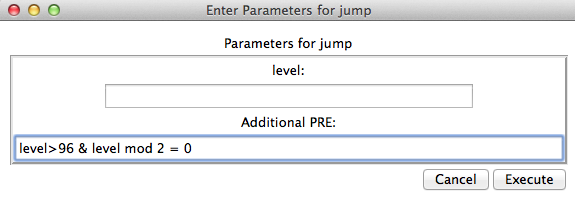
The above predicate, level>96 & level mod 2 =0 would select the same value 98 for level. When there are multiple solutions, ProB will only execute the operation for the first solution found.
Using Random enumeration
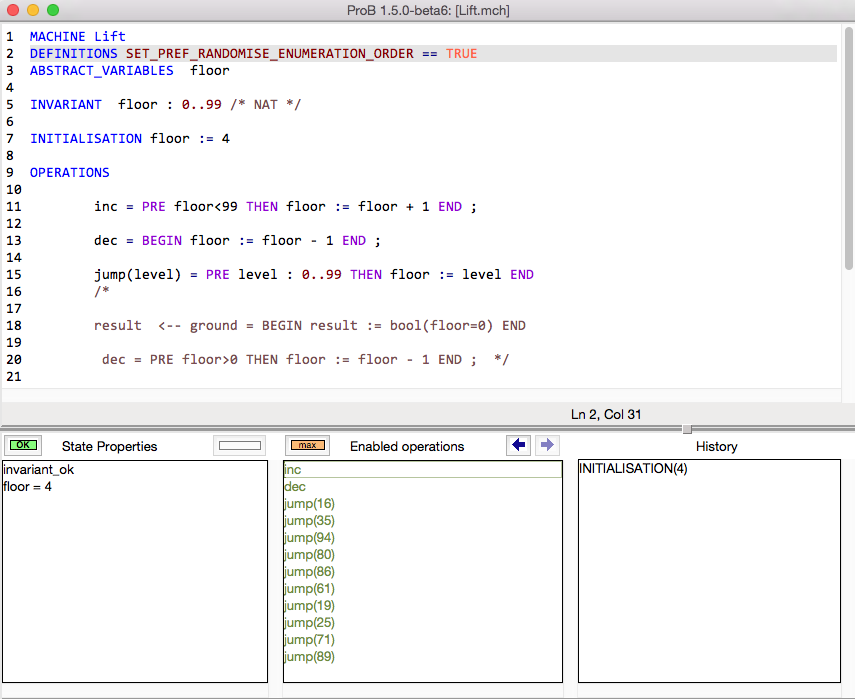
You can also tell ProB to try and perform random enumerations. This feature is available in ProB 1.5.0 or newer. You add the following lines to your model:
DEFINITIONS
  SET_PREF_RANDOMISE_ENUMERATION_ORDER == TRUE
Alternatively, you can set this preference using the "Advanced Preferences" pane in the Preferences menu. After reloading the machine you should see a picture similar to the following one:
Using Constraint-Based Validation Techniques
Find Sequence
You can also use the constraint solver to construct sequences which are of interest to you. Let us add the following operation to the lift model:
top_reached = PRE floor=99 THEN skip END
Now suppose we want to execute this new operation as early as possible. We can ask the constraint solver to generate a feasible sequence of operations. First select the "Find Sequence..." command in the Verify menu:
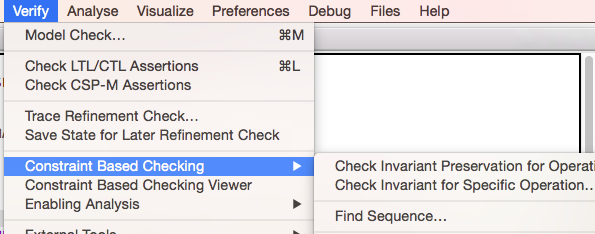
Now type in
jump ; top_reached
in this dialog box:

ProB will then find a solution operation sequence for you and execute it:
Constraint-Based Model-Based Testing
Alternatively, you could for example use the constraint-based test-case generator to find for every operation the shortest trace that enables it.
First select the "Constraint-based Testcase Generation.." command in the Analyse menu:
Now click on the ok button in the dialog box (which allows you to select the target operations to cover in the generated test cases):
ProB will then find four test cases for you, one for each operation:
You can also visualise these test cases as a tree by clicking the "View Tree" button:
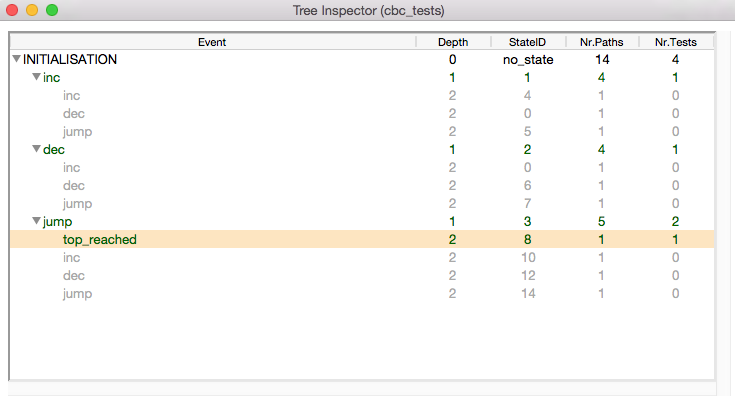
Green entries show test cases (traces which cover an operation in the shortest possible way), gray entries are traces which did not contribute to a test case.
More details are available in the Tutorial_Model-Based_Testing and Tutorial_Model_Checking,_Proof_and_CBC sections.
Using Trace Replay
You can store traces in JSON format using ProB. These traces contain values for the constants, initial values and operation arguments. If you wish you can generate such traces programmatically or modify them by hand and try to replay them.
Using EXTENDS
If you have many possible valuations for constants you may want to consider to generate one or more instantiations of your machine for animation or model checking.
For example, given a machine
MACHINE Generic
SETS USERS
CONSTANTS root
PROPERTIES root : USERS
END
In classical B you can use EXTENDS to create an instantiation machine:
MACHINE Instance1
EXTENDS Generic
CONSTANTS peter, paul, mary
PROPERTIES
  USERS = {peter,paul,mary} &
  card({peter,paul,mary}) = 3 & // all different
  root = mary
END
This instance machine acts a bit like a configuration file for ProB. In Event-B you can use the extends concept for contexts to achieve this effect, as explained here.