Tutorial Directed Model Checking: Difference between revisions
Created page with 'Category:User Manual We assume that you have completed Tutorial First Model Checking and Complete model checking. Here we will loo…' |
No edit summary |
||
| Line 18: | Line 18: | ||
<li>Out-Degree for Deadlock Checking (<tt>out_degree_hash</tt>): prioritise nodes with fewer outgoing transitions; mainly useful for deadlock checking. | <li>Out-Degree for Deadlock Checking (<tt>out_degree_hash</tt>): prioritise nodes with fewer outgoing transitions; mainly useful for deadlock checking. | ||
</ul> | </ul> | ||
To illustrate the effect of the search strategy we use the following simple example: | |||
<pre> | |||
MACHINE phonebook7 | |||
SETS | |||
Name ; Code = {c1,c2,c3,c4} | |||
VARIABLES db, active, activec | |||
DEFINITIONS | |||
scope_Name == 1..4 | |||
INVARIANT | |||
db : Name +-> Code & active:POW(Name) & activec:POW(Code) & | |||
dom(db) = active & ran(db) = activec | |||
ASSERTIONS | |||
card(active) >= card(activec) | |||
INITIALISATION | |||
db := {} || active := {} || activec := {} | |||
OPERATIONS | |||
dd <-- getdom = dd:= dom(db); | |||
cc <-- lookup(nn) = | |||
PRE | |||
nn : Name & nn : active | |||
THEN | |||
cc:=db(nn) | |||
END; | |||
add(nn,cc) = | |||
PRE | |||
nn:Name & cc:Code & nn /: active | |||
THEN | |||
db := db \/ { nn |-> cc} || active := active \/ {nn} || activec := activec \/ {cc} | |||
END; | |||
delete(nn,cc) = | |||
PRE | |||
nn:Name & cc:Code & nn: active & cc: activec & db(nn) = cc | |||
THEN | |||
db := db - { nn |-> cc} || active := active - {nn} || activec := db[(active - {nn})] | |||
END | |||
END | |||
</pre> | |||
We will illustrate the state space that ProB generates using the various search strategies when limiting the search to 10 nodes. For this we use the command-line version as follows (as there we can provide exactly how many states should be explored): | |||
$ probcli phonebook7.mch -p MAX_OPERATIONS 200 -mc 10 -spdot out.dot -p DOT_LEAVES FALSE -mc_mode <MODE> | |||
However, you can also obtain a similar effect with the Tcl/Tk version by starting the model checker and then quickly pressing the Cancel button and then inspecting the state space (Statespace command in the Visualise menu; see [[Tutorial_First_Model_Checking]]). | |||
Below we show the output of the above command for the various choices of <MODE>. | |||
=== Breadth-First === | |||
$ probcli phonebook7.mch -p MAX_OPERATIONS 200 -mc 10 -spdot out.dot -p DOT_LEAVES FALSE -mc_mode bf | |||
[[file:ProB_Phonebook7_spdot_bf.png|center]] | |||
=== Depth-First === | |||
$ probcli phonebook7.mch -p MAX_OPERATIONS 200 -mc 10 -spdot out.dot -p DOT_LEAVES FALSE -mc_mode df | |||
[[file:ProB_Phonebook7_spdot_df.png|center]] | |||
=== Mixed === | |||
$ probcli phonebook7.mch -p MAX_OPERATIONS 200 -mc 10 -spdot out.dot -p DOT_LEAVES FALSE -mc_mode mixed | |||
[[file:ProB_Phonebook7_spdot_mixed1.png|center]] | |||
[[file:ProB_Phonebook7_spdot_mixed2.png|center]] | |||
=== Random === | |||
$ probcli phonebook7.mch -p MAX_OPERATIONS 200 -mc 10 -spdot out.dot -p DOT_LEAVES FALSE -mc_mode random | |||
[[file:ProB_Phonebook7_spdot_random1.png|center]] | |||
[[file:ProB_Phonebook7_spdot_random2.png|center]] | |||
=== Hash === | |||
$ probcli phonebook7.mch -p MAX_OPERATIONS 200 -mc 10 -spdot out.dot -p DOT_LEAVES FALSE -mc_mode hash | |||
[[file:ProB_Phonebook7_spdot_hash.png|center]] | |||
=== Out-Degree === | |||
$ probcli phonebook7.mch -p MAX_OPERATIONS 200 -mc 10 -spdot out.dot -p DOT_LEAVES FALSE -mc_mode dlk | |||
[[file:ProB_Phonebook7_spdot_dlk.png|center]] | |||
Revision as of 10:20, 17 April 2015
We assume that you have completed Tutorial First Model Checking and Complete model checking.
Here we will look a bit closer at the search strategy options of the ProB model checker. You can set the mode using the -mc_mode <M> command-line switch of probcli. In the Tcl/Tk version you can select the strategy in the model checking dialog box (which you obtain via the"Model Check..." command in the "Verify" menu):
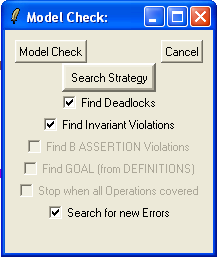
The following values are possible:
- Mixed DF/BF (mixed for mc_mode) : mixed depth-first / breadth-first traversal with random choice; currently the default),
- Breadth First (bf for mc_mode): breadth-first traversal,
- Depth First (df) depth-first traversal,
- Heuristic Function / Random (heuristic) : try and use HEURISTIC_FUNCTION provided by user in DEFINITIONS clause. Some explanations can be found in an example about directed model checking.
- Random (random) : choosing next node to process completely at random,
- Hash-Random (hash) :similar to random, but uses the Prolog hash function of a node instead of a random number generator,
- Out-Degree for Deadlock Checking (out_degree_hash): prioritise nodes with fewer outgoing transitions; mainly useful for deadlock checking.
To illustrate the effect of the search strategy we use the following simple example:
MACHINE phonebook7
SETS
	Name  ; Code = {c1,c2,c3,c4}
VARIABLES db, active, activec
DEFINITIONS
    scope_Name == 1..4
INVARIANT
		db : Name +-> Code & active:POW(Name) & activec:POW(Code) &
                dom(db) = active & ran(db) = activec
ASSERTIONS
  card(active) >= card(activec)
INITIALISATION
	db := {} || active := {} || activec := {}
OPERATIONS
dd <-- getdom = dd:= dom(db);
cc <-- lookup(nn) =
	PRE
		nn : Name & nn : active
	THEN
		cc:=db(nn)
	END;
add(nn,cc) =
	PRE
		nn:Name & cc:Code  & nn /: active
	THEN
		db := db \/ { nn |-> cc} || active := active \/ {nn} || activec := activec \/ {cc}
	END;
delete(nn,cc) =
        PRE
                nn:Name & cc:Code & nn: active & cc: activec & db(nn) = cc
        THEN
               db := db - { nn |-> cc} || active := active - {nn} || activec := db[(active - {nn})]
        END
END
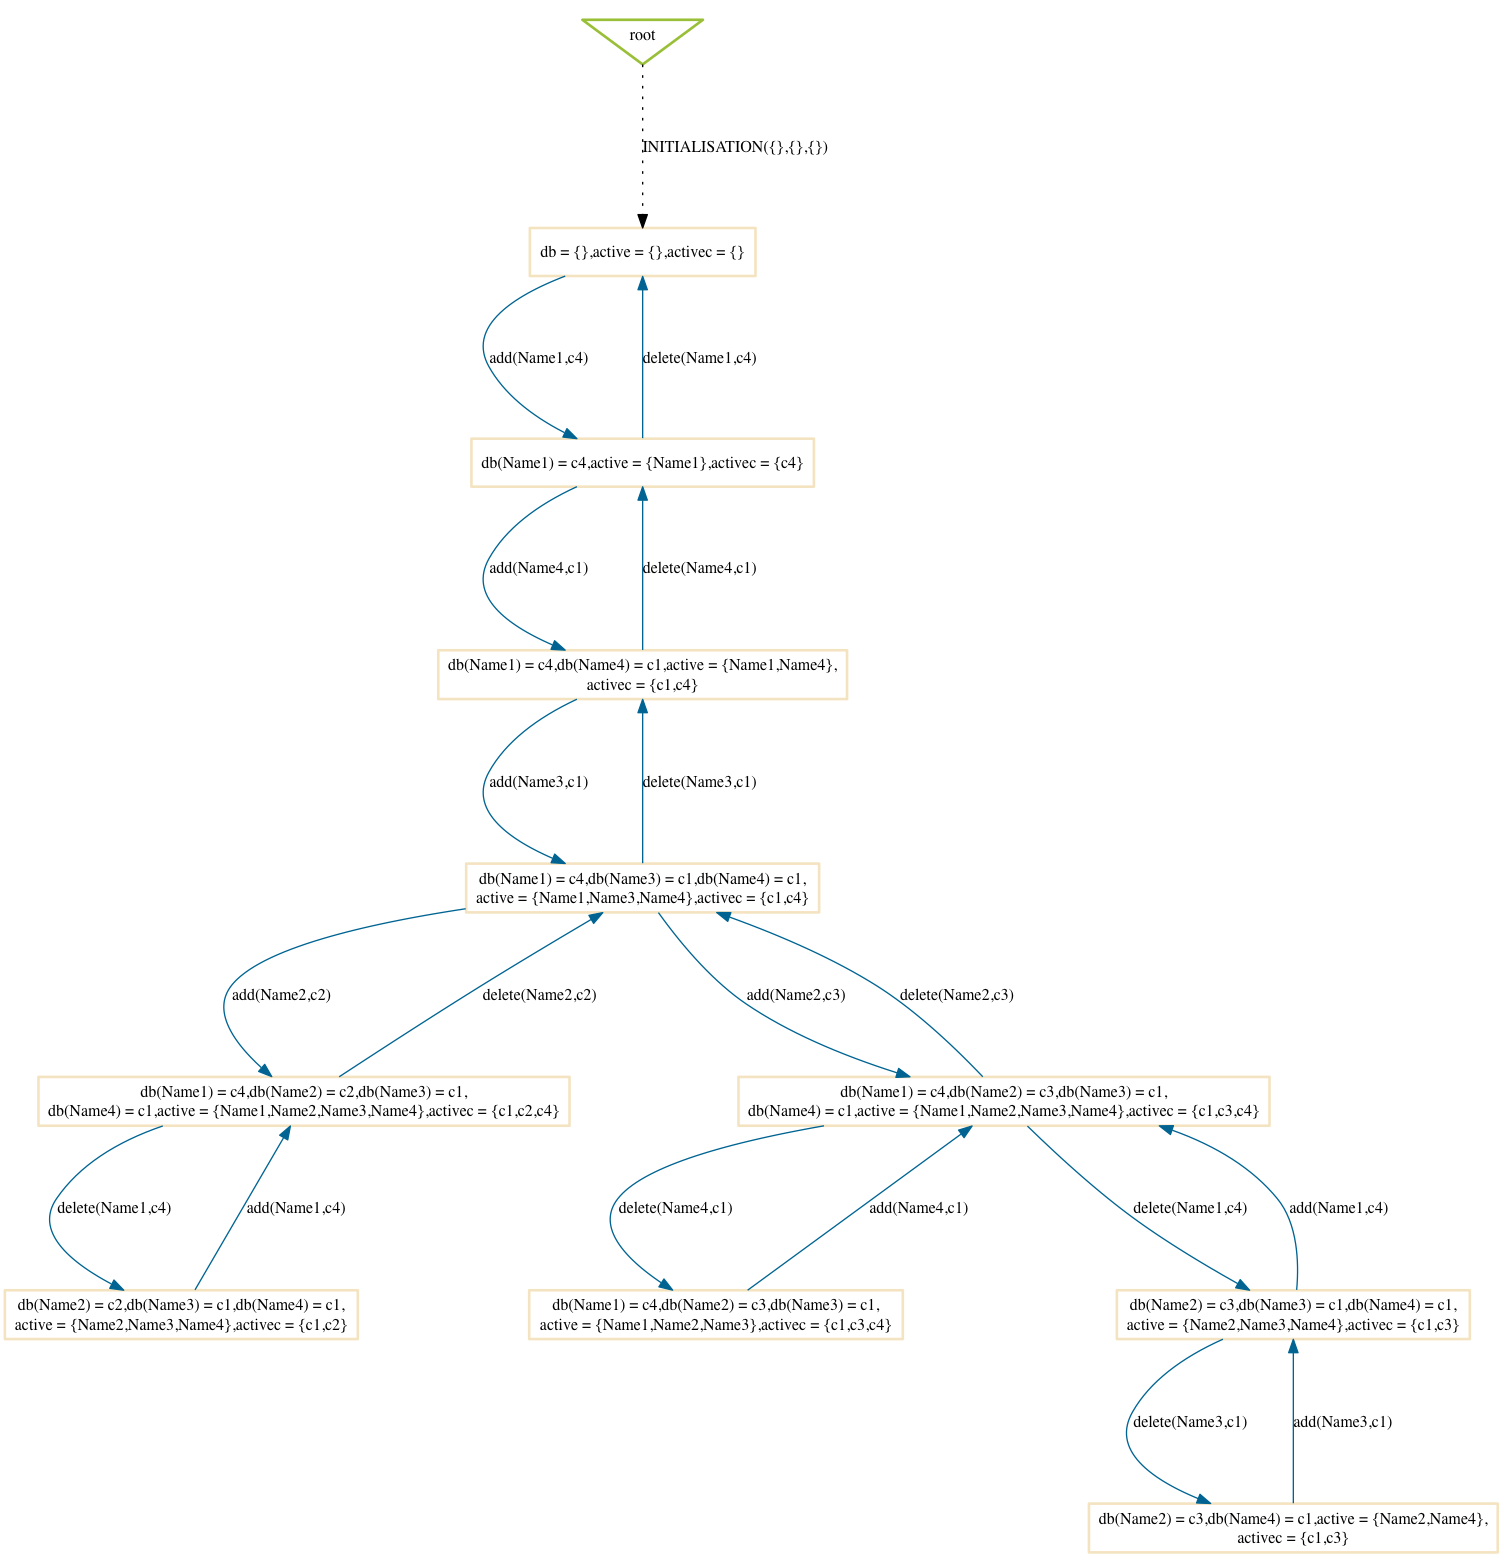
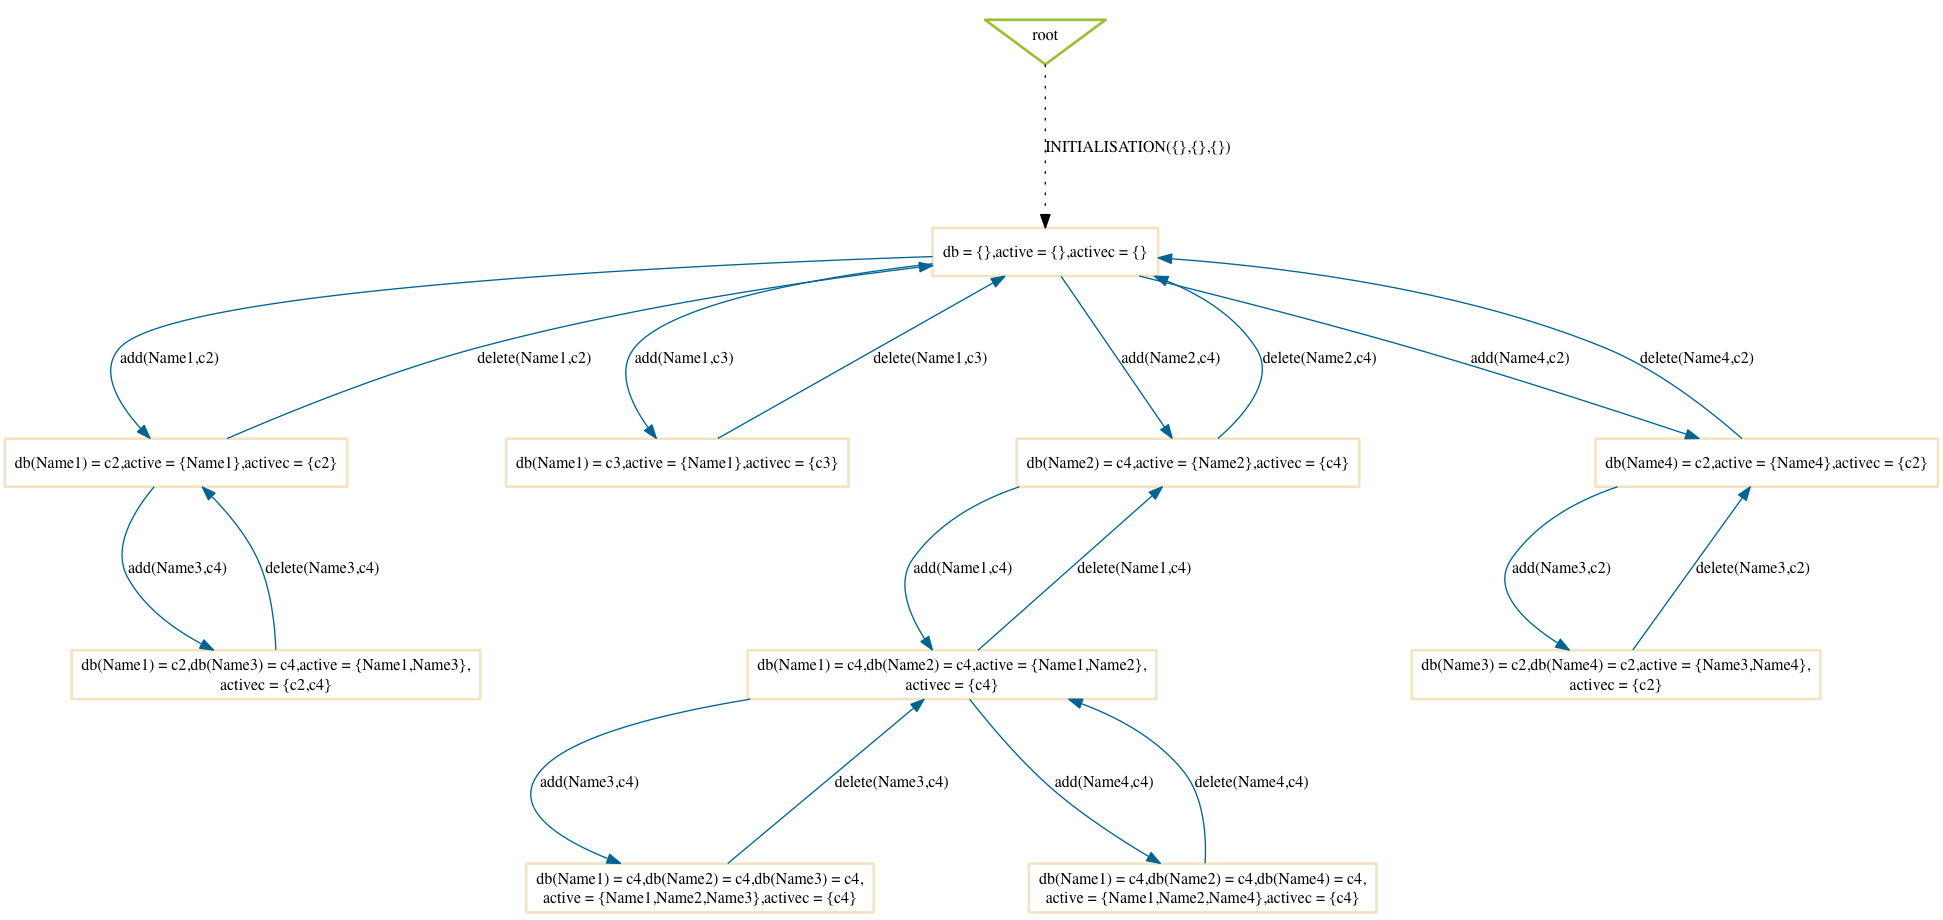
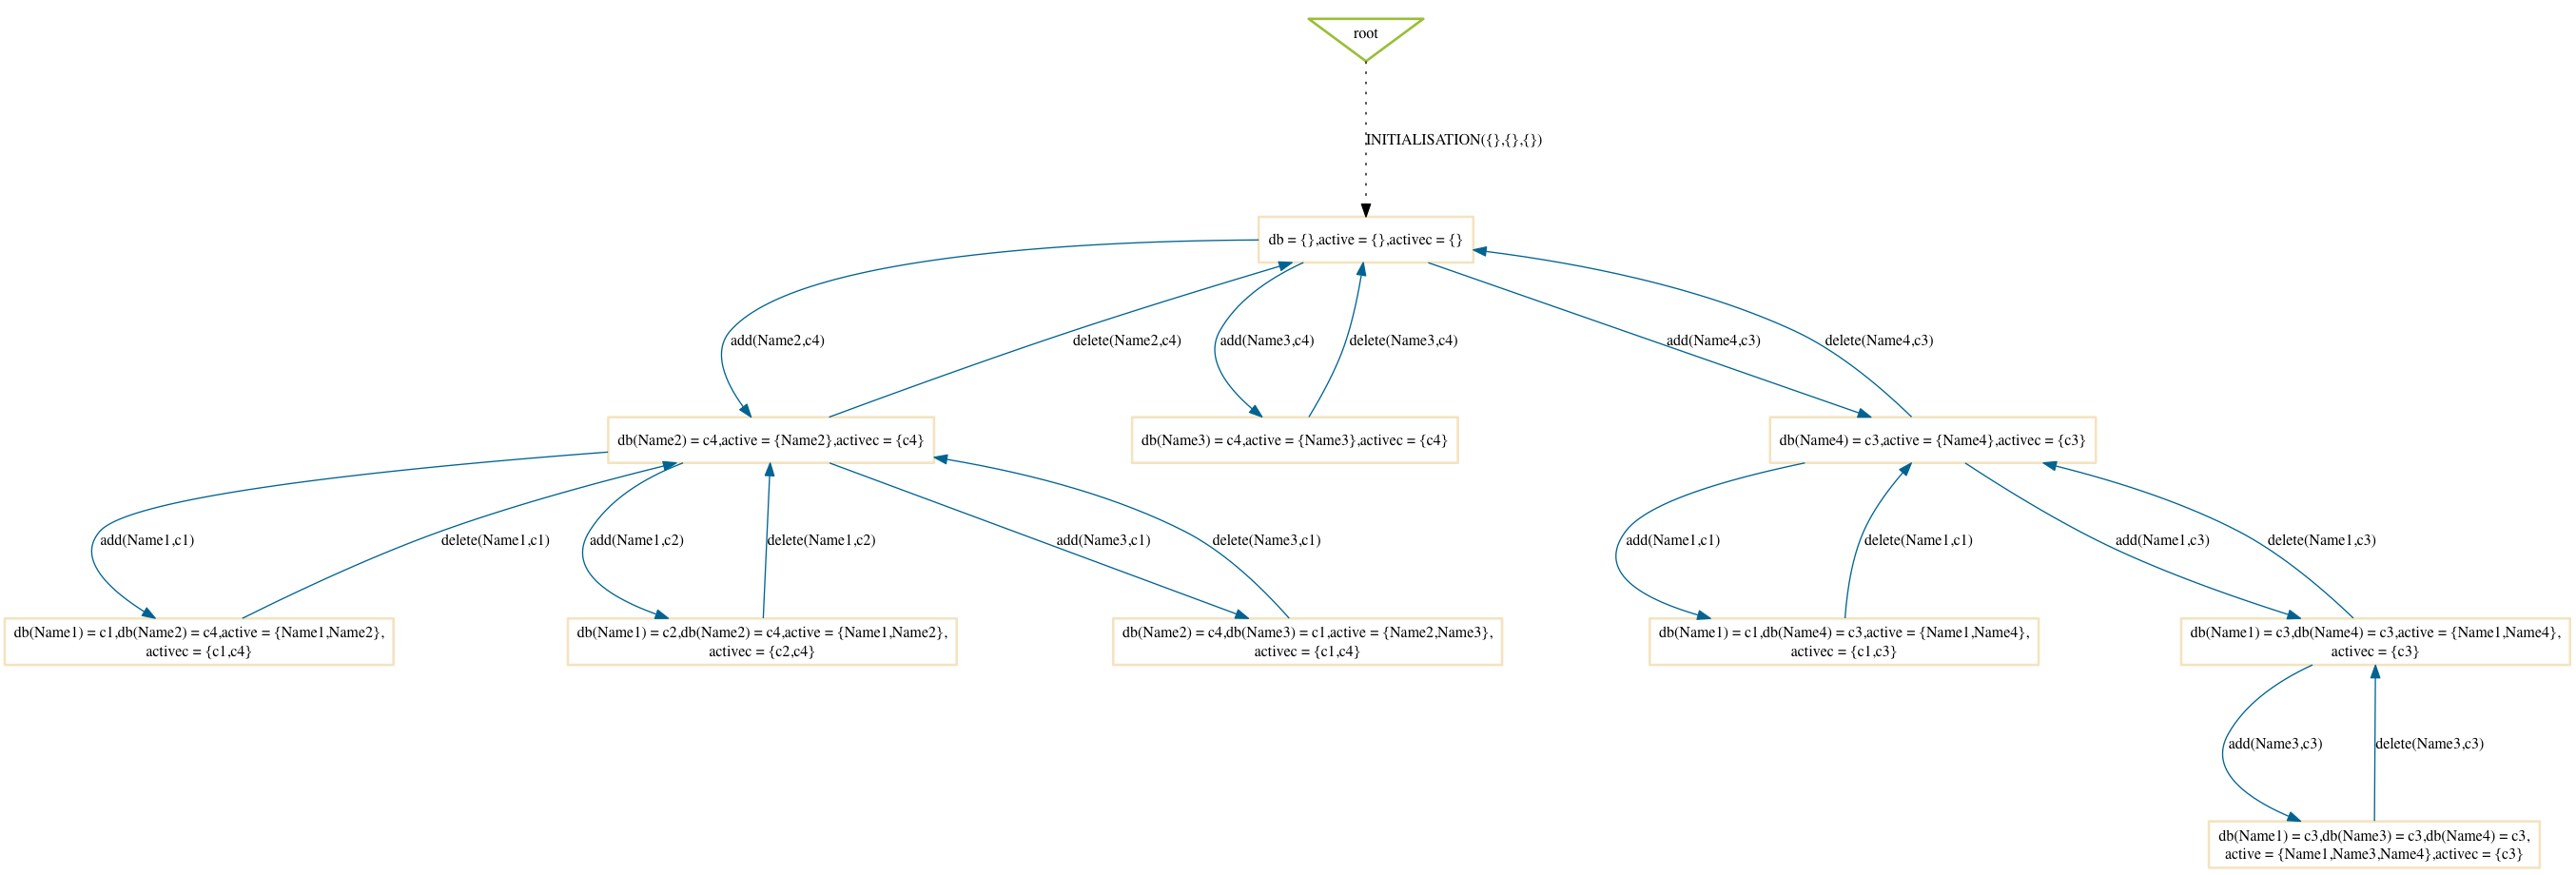
We will illustrate the state space that ProB generates using the various search strategies when limiting the search to 10 nodes. For this we use the command-line version as follows (as there we can provide exactly how many states should be explored):
$ probcli phonebook7.mch -p MAX_OPERATIONS 200 -mc 10 -spdot out.dot -p DOT_LEAVES FALSE -mc_mode <MODE>
However, you can also obtain a similar effect with the Tcl/Tk version by starting the model checker and then quickly pressing the Cancel button and then inspecting the state space (Statespace command in the Visualise menu; see Tutorial_First_Model_Checking). Below we show the output of the above command for the various choices of <MODE>.
Breadth-First
$ probcli phonebook7.mch -p MAX_OPERATIONS 200 -mc 10 -spdot out.dot -p DOT_LEAVES FALSE -mc_mode bf

Depth-First
$ probcli phonebook7.mch -p MAX_OPERATIONS 200 -mc 10 -spdot out.dot -p DOT_LEAVES FALSE -mc_mode df

Mixed
$ probcli phonebook7.mch -p MAX_OPERATIONS 200 -mc 10 -spdot out.dot -p DOT_LEAVES FALSE -mc_mode mixed
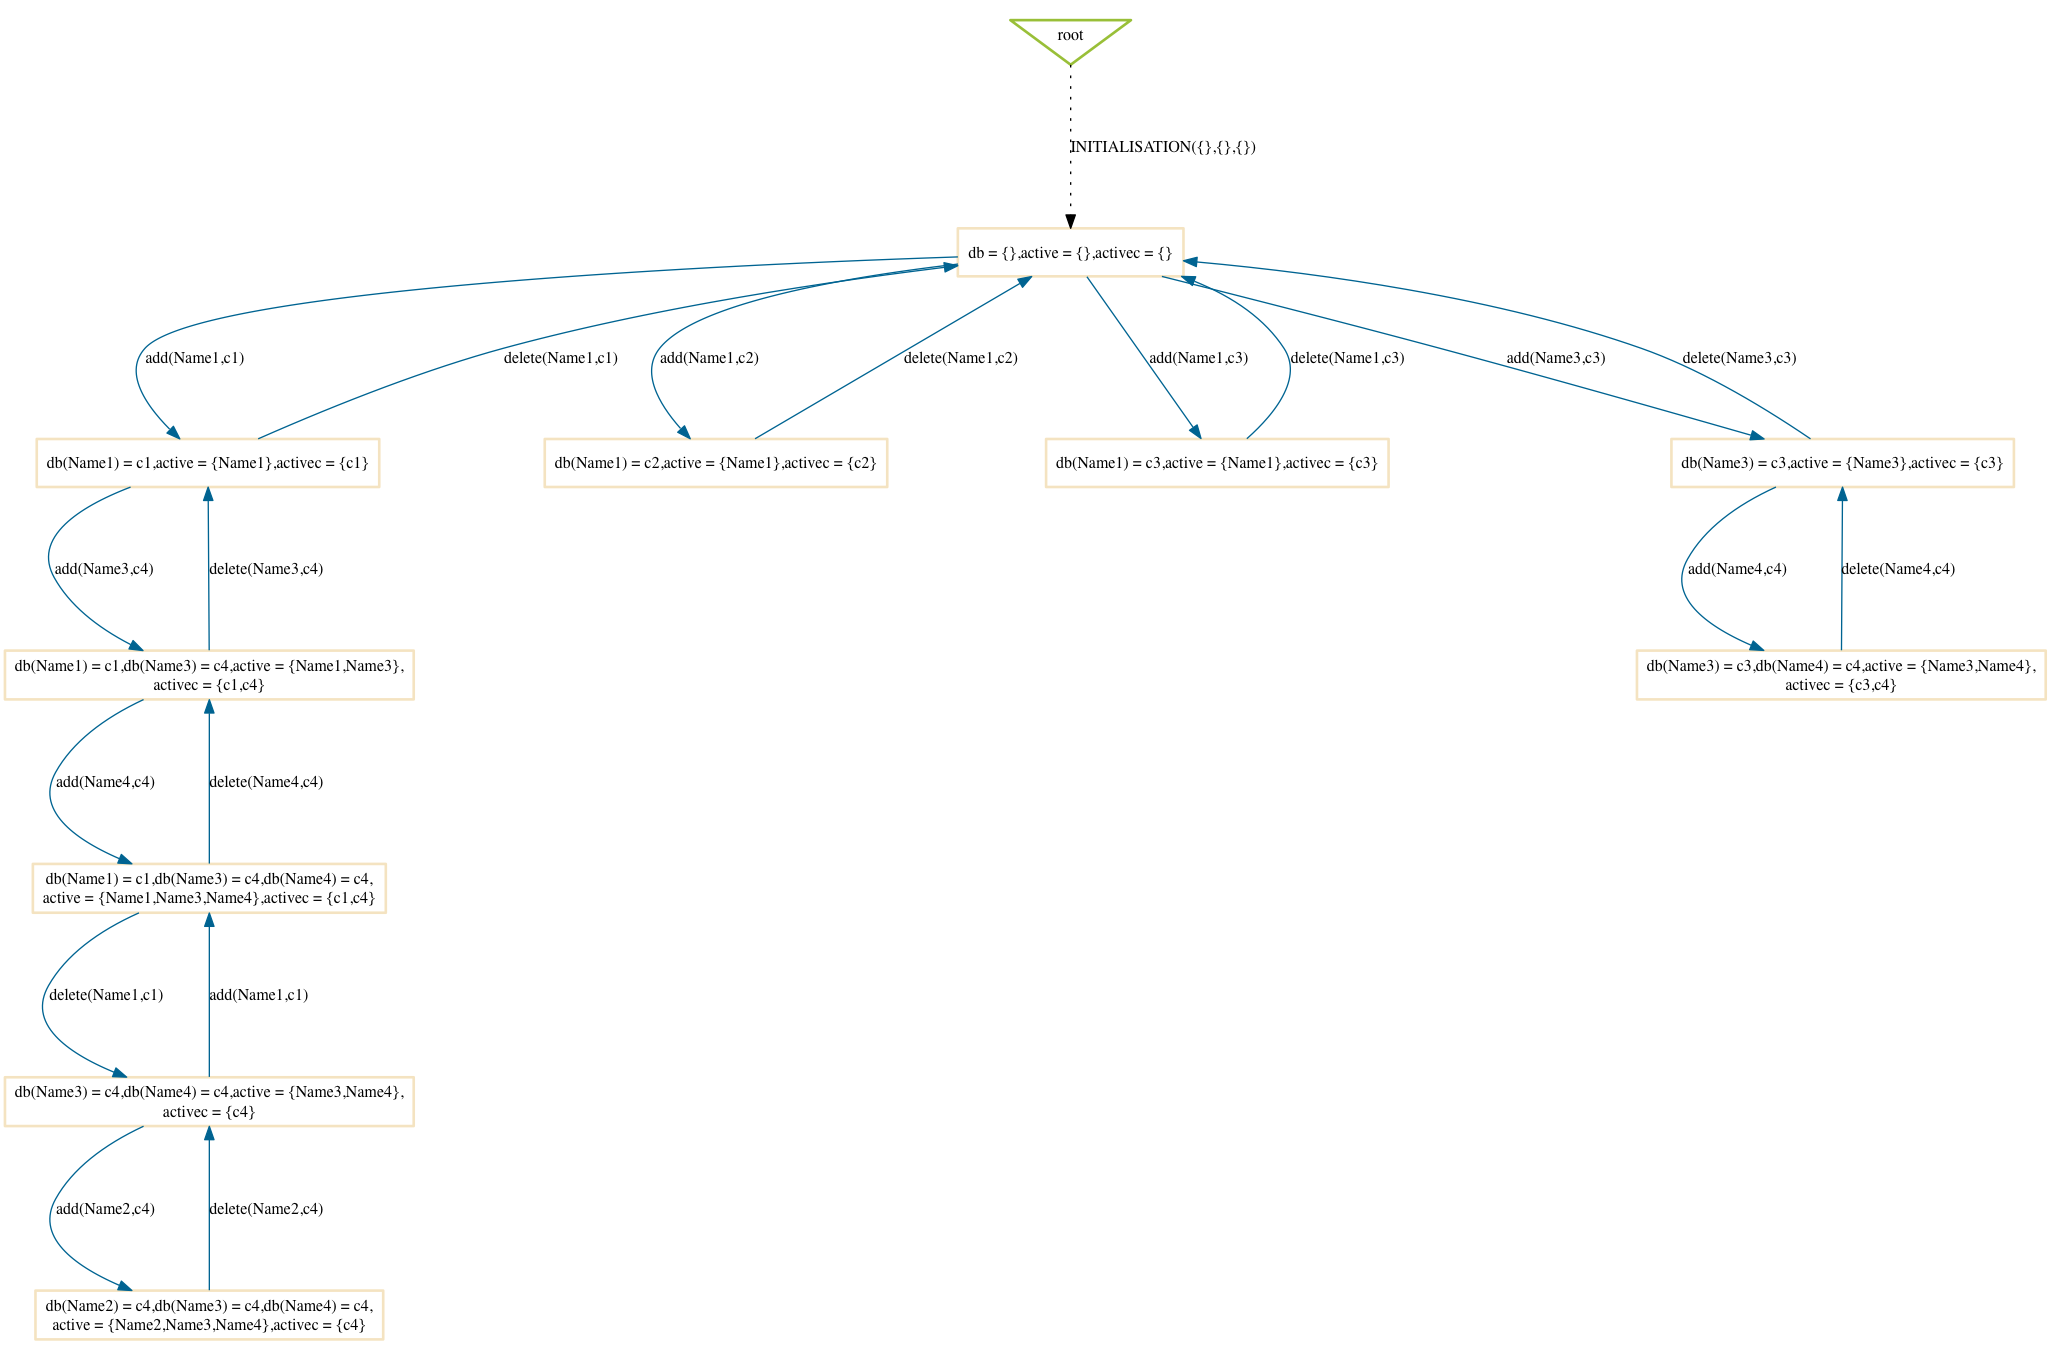

Random
$ probcli phonebook7.mch -p MAX_OPERATIONS 200 -mc 10 -spdot out.dot -p DOT_LEAVES FALSE -mc_mode random
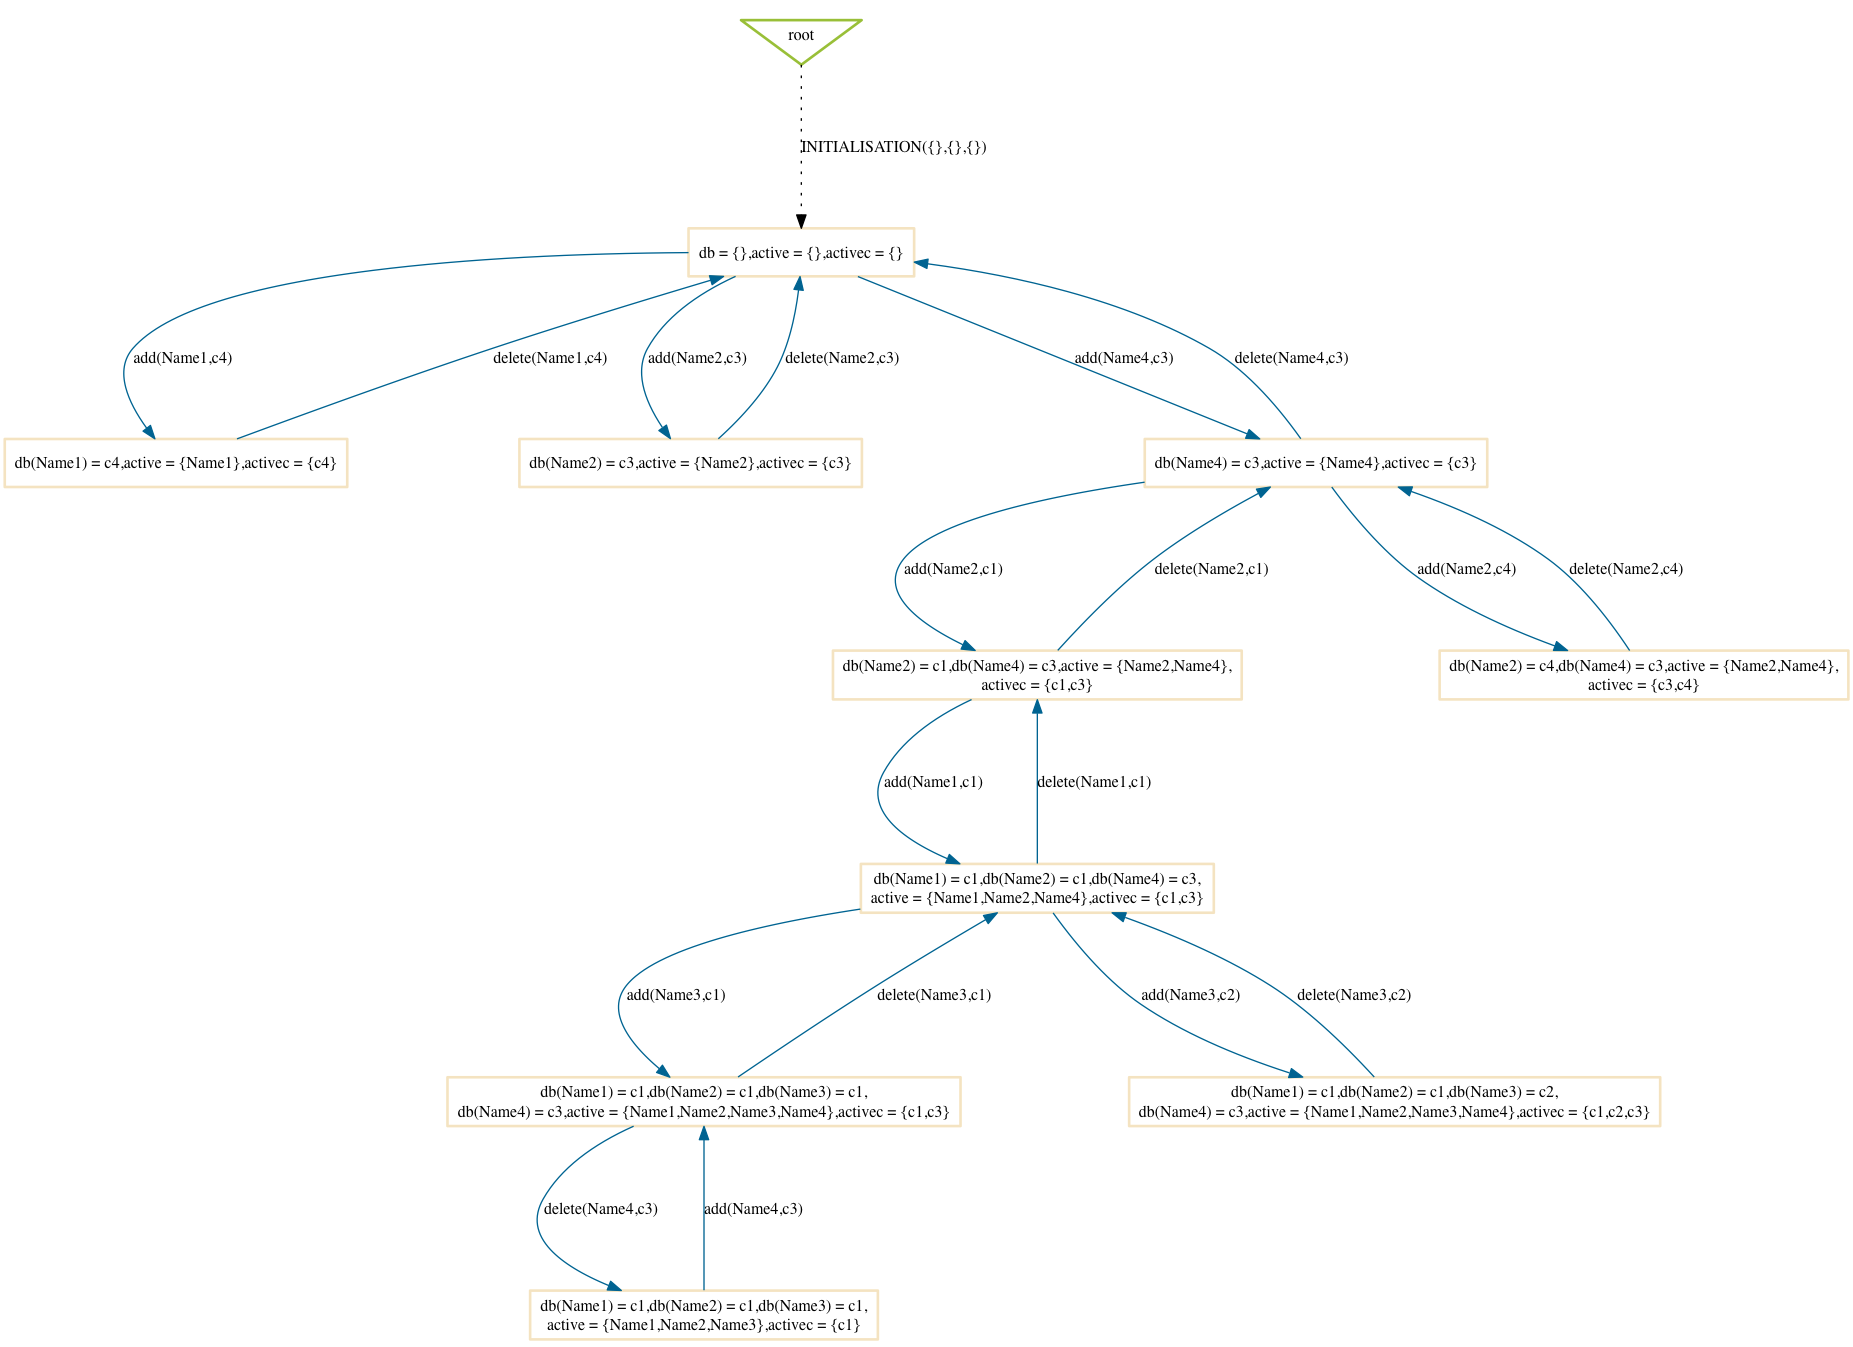
Hash
$ probcli phonebook7.mch -p MAX_OPERATIONS 200 -mc 10 -spdot out.dot -p DOT_LEAVES FALSE -mc_mode hash
Out-Degree
$ probcli phonebook7.mch -p MAX_OPERATIONS 200 -mc 10 -spdot out.dot -p DOT_LEAVES FALSE -mc_mode dlk
